I originally shared my Microsoft Excel Checkbook Register with the world in 2019. Since then, I have continued yearly updates after receiving positive feedback on YouTube. This is the older 2023 version. There’s also a newer 2024 version and a newer 2025 version.
“I mistakenly thought that Excel would have a simple and easy to use checkbook register template. Not so! They offer one but it was extremely frustrating to use. However, your spreadsheets were extremely easy to use and I thank you very, very much for sharing your expertise!” (John J.)
In a hurry and want the download? Click here.
System Requirements / Compatibility Notes: this Excel template is compatible with Excel 2013 or higher (Mac and Windows). It is not compatible with Google sheets, Open Office or any other office clone. If needed, the latest version of Microsoft Office is available for $99.99/year (or $9.99/month). Microsoft still offers a one-time purchase version called Office Home and Student 2024, for $149.99.
Sept 2025: A favorite computer magazine website of mine offers Microsoft Office 2021 (lifetime license) for a great price, if needed!
Types, Categories and Sub-Categories
In 2022, I added columns for sub-categories, categories and types. These work with the dashboards so that expenses can be charted based on those values. When entering transactions, you only have to choose a sub-category and the last two columns will automatically populate thanks to a pair of functions in Excel called INDEX and MATCH.
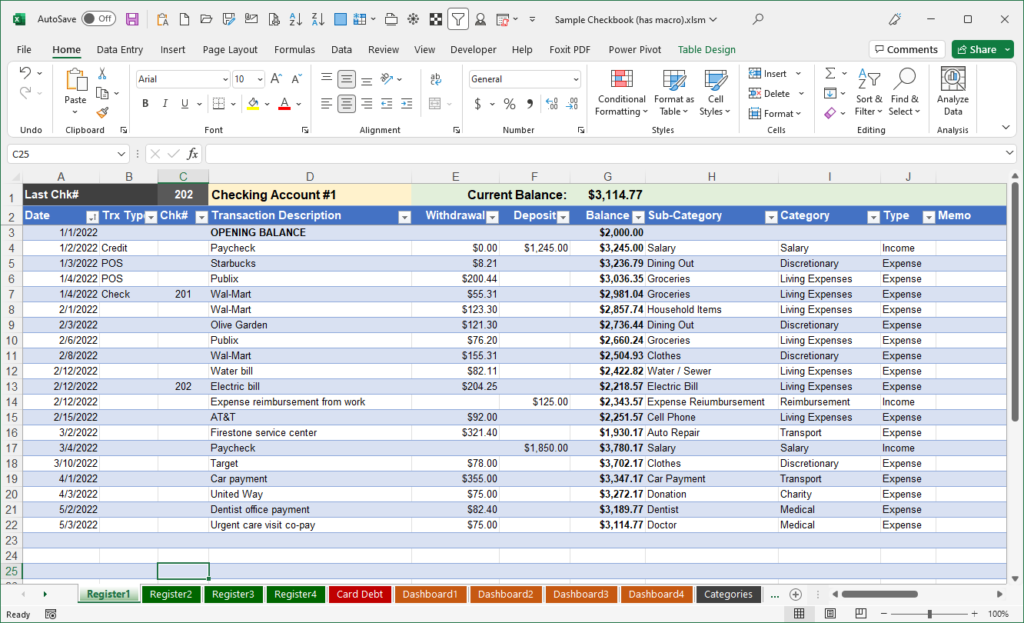
Trx Type and Memo Columns
My bank offers the ability to download my transactions, and they include a column for Transaction Type (Trx Type). While it’s certainly not necessary, I decided to add it to the sample spreadsheet. You might opt to delete or hide that column. I also added a column called Memo for entering additional info about a transaction.
Reconciling Transactions
A few users have asked for a way to reconcile their checkbook when they review their monthly bank statement. If that is of interest to you, the 2024 release or newer 2025 release includes that feature and much more.
Four Bank Accounts
This version supports up to four different bank accounts. There are separate worksheets labeled Register1, Register2, Register3 and Register4. You might opt to right-click on those tabs and rename them to something more meaningful.
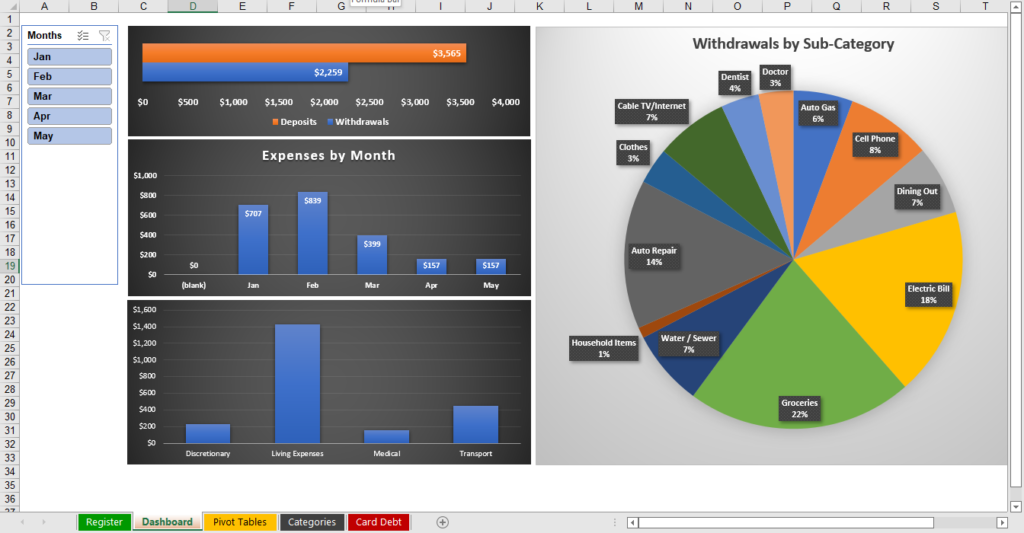
Dashboards
The current version has worksheets titled Dashboard1 thru Dashboard4. These correspond with the four register worksheets so that you can have separate charts for each bank account. You’ll see expenses per month along with a breakdown by broad categories and also sub-categories. There’s a slicer control on the left-side which lets you click on a particular month, and the charts will automatically change to reflect the values for that chosen month.
At the top of the slicer control, there’s a button you can click so that you can then choose two or more months that the charts will reference. And there’s a clear filter button at the top of the slicer to return things to normal (show all transactions in the charts).
Download
After purchase, you’ll have immediate access to two Excel files. The macro-enabled version has a simple button that will refresh the pivot tables with your latest register entries. You’ll also get a version that doesn’t have a macro which means you’ll have to refresh the pivot tables manually whenever needed. The YouTube video below will cover this.
Performance Update: I switched the formula for balance to use an INDEX function without any explicit cell references. The old formula used OFFSET which caused performance issues as your spreadsheet got larger. The new formula uses the Excel INDEX function.
This revised formula will improve the speed of the spreadsheet and it also makes it possible for you to safely delete or insert rows in the spreadsheet without an error.
How to Transfer (Copy) Your Transactions from an Old Version to the New Version
Please see this post and video which will demonstrate how to safely copy your bank transactions from any previous version to the latest version.
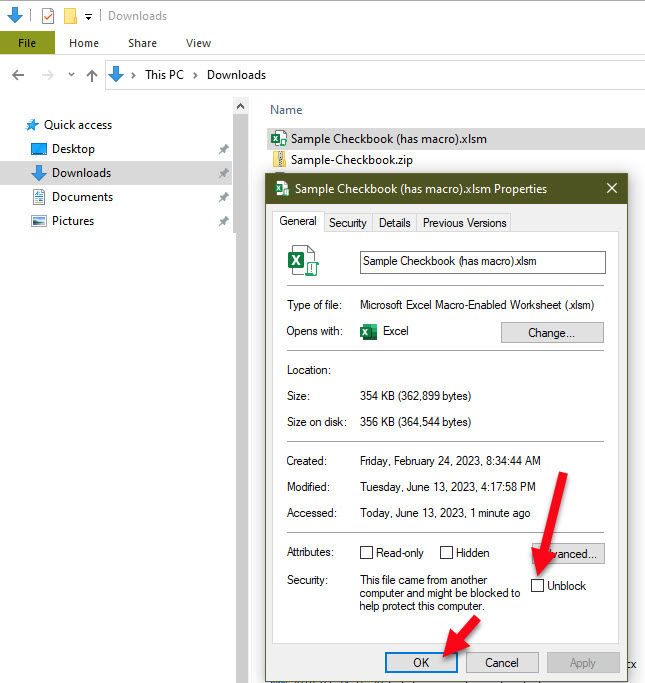
A note about macros / security warning / how to fix
If you choose the macro-enabled file, after you open it, you’ll likely see a warning like this:
“Microsoft has blocked macros from running because the source of this file is untrusted”.
The link in the warning will take you to this Microsoft article which also has the steps on how to unblock it. In summary, you’ll want to:
- Open Windows File Explorer and go to the folder where you saved the file.
- Right-click the file and choose Properties from the context menu.
- At the bottom of the General tab, select the Unblock checkbox and select OK.
To see a brief walk-through of the new version, see the YouTube video below.
Discover more from Excel Checkbook
Subscribe to get the latest posts sent to your email.