Frequently Asked Questions
Sections to jump to
- Initial Setup Questions
- General Use Questions & Importing Data
- Customizing the Checkbook / What is Safe to Change?
- Errors or Common Problems
- Misc / Business Use
Purchase and Initial Setup
Q: What version of Excel is required to use these spreadsheet templates?
A: Depending on which template you pick, Microsoft Excel version 2016 or 2021 is required for a Windows PC. For Mac users, Microsoft 365 is required. Google Sheets is not supported. Microsoft does offer an online (web browser) version of Excel but unfortunately, it does not support macros or Power Query. However, you can use the basic version of the checkbook register with the free online version of Excel. See this Google search link to determine what version of Excel you have.
Q: Is this checkbook template a subscription? Is there a recurring charge?
A: No. All of the checkbook templates on this site are ONE TIME purchases. There are no recurring charges. Please note that your bank statement might possibly show RECURRING PYMT on the charge which the payment processor (Stripe) is required to show, as other websites that use Stripe are sometimes set as a recurring payment. But you will never be charged more than once for these spreadsheet templates. (Stripe article link).
Q: I’m on a Windows PC and I’m getting a warning about “Blocked Content“, and that I need to review my trust center settings. Similarly, I see a warning that says, Microsoft has blocked macros from running because the source of this file is untrusted.
A: Please see this article for how to unblock this warning, which includes information on how to safely check for viruses or malware for any file downloaded from the Internet.
Q: Why does Excel warn me about an external data connection when I open it?? Is this spreadsheet sending data to you or someone else?
A: No, your data is not being shared. The spreadsheet uses Excel’s Power Query to create a large table of all of the registers so that the Dashboard and Report screen can consolidate that data while also offering filter buttons (slicers) to hone in on just certain areas that you want to see at any moment. It’s unfortunate that Excel considers its own feature (Power Query) as an external data connection, but it does! The spreadsheet does not send any data to me nor to any outside service. One of the reasons I like using a spreadsheet like Excel for my finances is that I don’t want my data with any 3rd party! I’m sure you feel the same. 🙂 When you’re in Excel, there’s a menu choice called Data. And under that menu choice, there are buttons to see the Queries & Connections. It will show queries for the registers along with an “All_Registers” which is the combination of all of the registers for the benefit of the dashboard and report. But there are no connections to the outside world nor to any Internet service.
Q: Can you use the small business version for personal bank accounts? Or visa versa, can you use the home version for small business? What are the major differences?
A: The small business version is targeted to those who operate one or more small businesses. It includes a Profit & Loss (P&L) statement and the Reports screen is better tailored for small business expense and income review. The register also features a column to designate which small business a transaction is for while also letting you designate when a transaction might be for personal use. The home version does not have a P&L statement, but it does have a column called Sub-Category which allows you to be more granular when categorizing your transactions. While it’s possible to use the small business version for personal home use, you won’t have the sub-category column to fine-tune the categorization of personal transactions. Similarly, the home version could be used for small business but it lacks the P&L statement, and it lacks the ability to designate which small business a transaction is for when you are using the same bank account or credit card account for more than one business.
Q: Is there a free version of Excel or a free spreadsheet program that can be used with this checkbook spreadsheet?
A: Microsoft does offer Excel Online through a browser (Google Chrome, Microsoft Edge) for free, and it is possible to use my basic checkbook register or the 2023 version that doesn’t have a macro. Excel Online doesn’t support macros so my 2024 version of the checkbook won’t work but you can upload Excel files without macros to Excel Online.
Q: Is it okay to use a cloud storage (file syncing) service like OneDrive, Dropbox, Apple iCloud, or Google Drive with the checkbook spreadsheet?
A: Yes! Absolutely! I strongly recommend that you do so. Please see this brief article.
General Use Questions & Importing Data
Q: I just started to use the spreadsheet and I’m noticing that after entering some withdrawals, the Balance column isn’t showing any value. Is something broken?
A: Make sure that you enter some text in the Description column for each transaction. The spreadsheet has been configured with conditional formatting so that the value in the Balance column is hidden unless you enter something in the Description cell.
Q: If I have been using a previous version, how can I upgrade or move my data to a newer version?
A: Please see the YouTube video on this page for a demonstration on how to do so.
Q: Is it possible to download my bank transactions and get them into this spreadsheet?
A: Yes. Nearly all banks will allow you to download your checking or savings account transactions to a CSV file which Excel will open. The trick is to then reformat that spreadsheet from the bank so that it has a similar layout of columns as the Excel Checkbook Register. In other words, you’ll need to add/remove columns from the bank file so that you have columns for: Date, Trx Type, Check#, Payee/Description, Withdrawal and Deposit. I frequently download my bank transactions, and after a quick reformat, I then copy/paste those columns (being careful to NOT include the balance values) over to my checkbook. Please see this list of articles for popular banks with step-by-step instructions.
Q: Do you have an article on how to export my data from Quicken and get it into this Excel Checkbook spreadsheet?
A: Yes. See this article for the steps to follow.
Q: Can you print checks from the Excel Checkbook?
A: No, the Excel spreadsheet template does not have any check printing capability. However, a few alternatives include: (1) Use an online check printing service like Checkeeper.com; (2) Use your bank’s bill pay service which can typically mail and print checks automatically for you; (3) Use a software program like CheckBuilderPro if you need to frequently print checks.
Q: How can you insert a transaction (row) in the register in order to add a missing entry?
A: Using standard Excel features, you can insert a row anywhere you’d like. A few ways to do so include: (1) Right-click your mouse on a row number, and choose Insert; (2) With your cursor or mouse in one of the cells of an existing row, look on the main ribbon bar for Insert and click that button. A new empty row will be inserted above. Here’s a short YouTube video to demonstrate.
Q: Is there an automated way to transfer funds between accounts? In other words, can I put an entry into my register and have that entry automatically reflect the corresponding transfer in the other register?
A: Yes, the 2025 version has a newly added feature to automate this.
Q: Can you split a transaction into separate entries for categorizing?
A: Yes! Newly added in April 2025, there’s now a feature to automate the split of a transaction across multiple categories.
Q: Can you archive old transactions and then erase old entries at the beginning of a new year? Is there a year-end-copy feature like Quicken has?
A: While there’s no automated feature to do a end of year copy/archive, the following article will walk you through the steps to do so. Please note that it is not necessary to do so, and it can be advantageous to keep previous year data for reporting and comparison purposes.
Customizing the Checkbook / What is Safe to Change?
Q: Can you rename the tabs (sheet names) at the bottom of the spreadsheet so they say something other than Register1, Register2, etc.?
A: Yes, just point your mouse at a bottom tab and right-click it and choose Rename. Type your preferred name and press Enter.
Q: What else can I safely change or customize about the checkbook spreadsheet?
A: You can safely change colors and the fonts used; You can insert (add) your own worksheets; You can change the number formatting to a currency style; You can customize the categories and sub-categories list; and you can add additional columns to the registers as long as those columns are added to the right of the current ‘Memo’ column.
Q: Can I delete or rename the column headings in the register worksheets?
A: Please don’t! If you rename any of the existing column headings (e.g., change “Deposit” to “Credit” or change “Chk#” to something else), the register worksheets will still function okay, but the Dashboard will stop working. Similarly, if you delete a column that you don’t need, the Dashboard will break. However, you can safely hide a column that you don’t use using Excel’s standard feature to hide a column.
Q: Can you safely delete (remove) the extra Register sheets that won’t be needed? For example, can I delete Register4, Register5, etc.?
A: No, please don’t delete any of the register worksheets! If you do, when you attempt to Refresh the dashboard, you’ll see this error: “[Expression.Error] The key didn’t match any rows in the table.” As an alternative, you can right-click on the extra register worksheets and choose ‘Hide’, or you can drag the tabs to the right to re-arrange them and move them out of the way. The error mentioned earlier occurs because the dashboard uses an Excel Power Query that has been programmed to look for transactions in all of the register worksheets. If you experience this error, I recommend re-downloading the Excel checkbook and then copy your transactions and categories over to a fresh copy of the spreadsheet, but don’t delete the unused register worksheets. Alternatively, you could edit the Excel Power Query and remove the reference to the register worksheets that were deleted. Contact me for additional info on this.
Errors or Common Problems
Q: I’m using the 2025 version and the “Frequently Used Payees” feature. I’m seeing little green triangles in the sub-category cells. Excel says there’s an Inconsistent Calculated Column Formula.
A: See this post for how to quickly resolve this (also covered in this short YouTube video).
Q: I’m trying to reconcile my bank account while looking at my monthly bank statement, but I can’t get it to reconcile. For example, the checkbook tells me I have a smaller amount of withdrawals vs. what my bank statement tells me.
A: One common cause for this is that you accidentally entered the wrong year for the date in a transaction in your register. For example, if you are reconciling transactions for November 2024, if you accidentally entered one of your entries as 11/4/2025, that would be outside of the date range because you entered the wrong year. Please see this post for additional tips and common issues.
Q: I get a date-related error when I click to Refresh the Dashboard. The error I see is: [dataformat.error] We couldn’t parse the input provided as a date value.
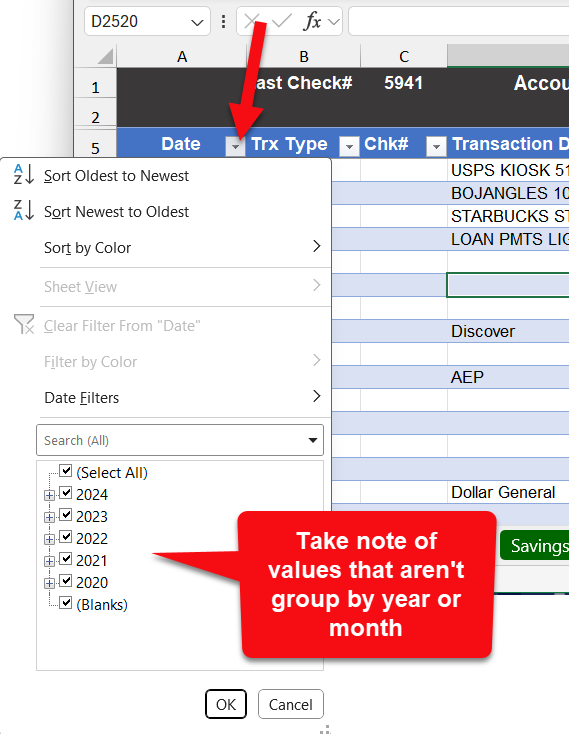
A: When this happens, there’s one or more entries in the date column in your register causing the issue. It could be some random text or a number instead of a valid date. You can use Excel’s filter feature to help find those odd entries. Note: you’ll need to do this on each register sheet until you find the entry (entries) that need correction.
INSTRUCTIONS: Click the little down-arrow on the DATE column which will reveal a list of date filters. In my screenshot below (Figure 1), I have good valid dates and they are all grouped by year. But when you have entered a number or some random text in the date column of your register, it will show up as a separate filter choice. When you see that oddity, you can uncheck all of the valid date entries so that only your bad entry remains check marked; click OK, and then your bad entry should be the only transaction that appears in the register. You can then fix it, and re-visit that down-arrow on the DATE column and choose the “Clear Filter” choice so that all of your entries are once again visible. Repeat that process on your register sheets, and be sure to save your file before attempting to Refresh the dashboard.

Q: (Mac Users): When I go to update the data source setting so that the Dashboard will work, I get a message that says: Microsoft.Mashup.Container wants to use your confidential information stored in “Microsoft.Office.Excel.ProtectedDataServices” in your keychain. What should I do?
A: To resolve this, when the spreadsheet is first opened, the status bar in Excel warns you about external data connections, and it’s important to click on “Enable Content” (that button appears on the far-right side of the Excel screen). Next, when you visit the “Data” menu and pick “Data Source Settings…” you might get the Microsoft.Mashup.Container.app pop-up message. You’ll need to put in your Mac password and click on “Always Allow” to make it go away and get things working. Here are a few articles from trusted sources about this keychain pop-up, if there are concerns: Microsoft support article / Microsoft community article
Misc Questions / Business Use
Q: Can this spreadsheet be used to manage or track investment properties, portfolios and/or for business or rental properties?
A: While the 2024 and 2025 versions are intended for personal use, it is possible to use either version for managing basic checking accounts and savings accounts of a small business. However, please see the small business edition to see if it fits your needs.
Q: Is there a way to produce something like a Profit and Loss (P&L) statement or report?
A: Yes, using Excel’s pivot table feature, you can generate a table that summarizes expenses and deposits by category. Also consider the small business edition of my checkbook template.
See this video or follow this basic summary.
(1) Go to the register worksheet that you want to summarize. Click on the Insert menu and choose PivotTable.
(2) The default settings for “New Worksheet” are best so just click OK.
(3) In the pivot table fields box, drag the Years (Date) field down into the Rows box. Drag the Sub-Category field into the Rows box but place it under the Years (Date) field.
(4) Drag the Withdrawal into the Values box. Do the same for the Deposit field.
You’ll now have a summary of expenses and deposits by year.

